
Overview
In order to achieve portable and simple field allergy detection, we designed and manufactured the hardware testing equipment for this project - a small, inexpensive ($20) system, including a device can measure OD600 and fluorescence intensity, and a small automatic vibration device avoiding the sinking of cells.
The device supports battery or micro USB for power supply. According to the prompts on the display, you can get started quickly; the device will judge your allergies based on the cell concentration and fluorescence intensity after a certain period of reaction.
In addition to the detection applied to this project, this device can also be used in other environments where fast and portable spectrophotometric detection or fluorescence intensity detection is needed.
We refer to the design of Team Aachen, 2014, but our Devices are more automated and miniaturized.
Designed steps for usage
- Activate the yeast.
- Mix the blood and allergen, turn on our measure device (click the power button on the left).
- After the time on the display is completed, or press the GO button to skip the timing, with another timer, add the serum (filter with a syringe and filter to obtain serum / if it is a hospital scene, the blood drawn from the vein can be centrifuged) and t yeast solution to the cuvette; cover with waterproof breathable membrane.
- Open the lid, place the cuvette in the test hole, then close the lid, and press 'GO'.
- When the display prompts, stick the vibrating device to the cuvette and insert the battery, press 'GO'.
- When the oscillation time is up, remove the motor, then close the cover and press 'GO'.
- Wait for the result to appear on the display.
- Double-click the power button to turn off the power. Dispose of waste.
More information:video and file
Performance testing
OD Function Testing
Test method
We made two groups of a series of cells samples with different concentration by gradient dilution. And we used OD function of our device and spectrophotometer to test the sample respectively. By this way, we can get a relation between the readout of our kit and the real OD value. If the relation is linear, we can use a linear model to analyze and predict.
Result

$$ spectrophotometer=-0.06759+4.61774 DeviceReadout_i+\epsilon_i /; \epsilon_i~N(0,0.0052) $$
Taking the OD values measured by spectrophotometer as real values, it is obvious that the real OD values can be derived from the readout of our device, which means that our device is able to measure the OD value of samples accurately.
Florescence Function Testing
Test method
As we already derived the model of OD function of our kit, we design a method to test our florescence function based on it. We made a group of cells samples that steadily express the fluorescence protein by gradient dilution, and use our hardware to measure the OD values and Fluorescence intensity of each sample. As the criteria of the method, the OD values should be proportion to the fluorescence intensity of samples. So we use this method to test if the florescence function of our kit can actually work on florescence intensity testing.
Result

$$ FL_i=53.828+88.287OD_i+\epsilon_i /; \epsilon_i~N(0,6.16) $$
The linear regression model is shown above, which implies us that the florescence function can regularly work. And it can test the florescence based on the linear model we made.
For testing data and more details about data analysis, please look up in data
Design and components
In order to make such a device, we have to minimize the size when we select of the components and design the bracket.
The overall design
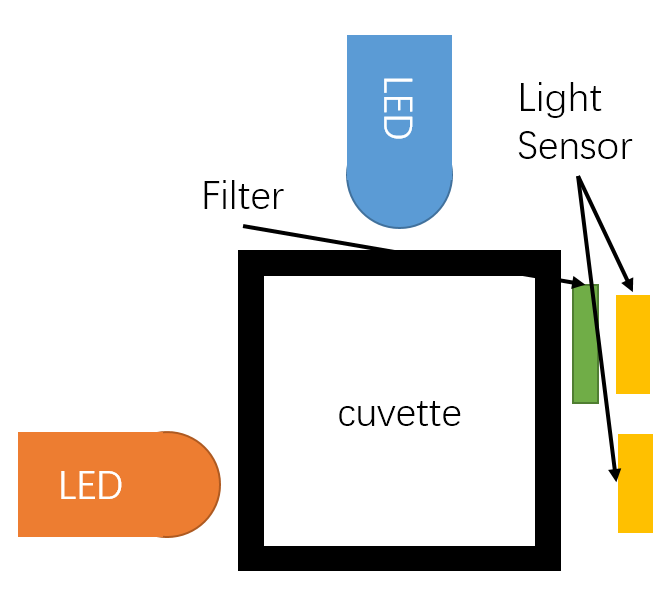
Our reaction system is about 800μL, which heights approximately 8mm in the common 10mm cuvette. Therefore, we choose the position which optical pass is 4mm high. Although simply changing filter paper can reuse photosensor, to make it more automatically, we use two photosensors with different light filters to sense different light. Optical pass design is displayed in figure. If we switch on LED in a certain order and measure light intensity respectively, we can calculate the intensity of transmitted light. According to the intensity results before and after the reaction, we obtain the cell density and fluorescent intensity in the solution.

The 3D-printed cuvette brace offered space for LED and photosensor to be attached. The space for the cuvette is slightly larger than the size of cuvette, leaving extra space for vibration. During the measurement, inlay the cuvette into the fitting hole in order to fix it.
The 3D-printed shell is a box with four interfaces attached to the brace. The baffle plate covers and protects details of the system, leaving a hole for the cuvette.
Processor
Beetle
We chose a small MCU - Beetle based on Arduino Leonardo as processor. It is very small in size, only 20mm by 22mm. In addition, it has a microUSB which can be burned directly, and it can also be connected by wire directly, which is very convenient for debugging.
Filters
We use reden filter paper as our filters, which is usually used in photography. It is not as good as professional filter but it is cheaper and easy to obtain in China.
Power Module
For portable purposes, we use both batteries and power cords for power supply. Specifically, we use a 150mAh battery, a power management module suitable for lithium battery, and a micro USB interface for charging. It is connected to a button, which is clicked for start and double - clicked for shutdown.
Photosensitive Sensor
TSL235R
The same as Team Aachen, we choose this photosensitive sensor for its small size, which is only 4.6*2.6*4.6
LED
We use 605nm and 485nm LED, which variance is less than 5nm.
Temperature Sensor
LM35DZ
LM35DZ is a cheap and fine temperature sensor, we use it to remind the users to put the yeast in a proper temperature for cultivation.
Display Screen
In order to display the results visually, we choose to use the display screen to demonstrate the results. We choose a small display screen,0.96 inch, which uses the IIC communication protocol
| Component | Quantity | Total Price |
|---|---|---|
| Beetle | 1 | ¥49 |
| TSL235 | 2 | ¥20 |
| LED | 605nm,485nm | ¥10 |
| Light filter | Scarlet*2,Light Green | ¥0.75 |
| LM35 | 1 | ¥4.7 |
| Battery | 1 | ¥9.9 |
| Power Module | 1 | ¥12.8 |
| MicroUSB | 1 | ¥49 |
| OLED Displayer | 1 | ¥12.7 |
| 3D printed parts (material) | 4 | ¥5 |
| self-locking switch key | 1 | ¥0.26 |
| Wires(AWG30) | 3 | ¥3 |
| Cuvette 4.5mL | 1 | ¥0.7 |
| button cel CR1225 | 5 | ¥8.8 |
| button cell holder | 1 | ¥0.91 |
| vibration motor | 1 | ¥1.78 |
| Total | 135.7($20.67) |
Manufacture
cuvettes
- use a four-sided smooth cuvette for laser cutting to make it 30mm high.
- Buy or make a proper cover for it.
- Prepare some PTFE membrane
Vibration device Video
- Vibration motor
- Button battery
- Button battery holder
Connect the holder and motor, and fix it with adhesive. Put in the battery when use it.
Testing device
- 3D printing file for the shell and stent
- 3D Pringting Files
- You can change shape of holes in the model to fit your buttons and microUSB
- Try to use a lightproof material for 3D printing. If you don't have one, just try to make it light-tight.
- Wiring
- Analog
- LED*2(remember to have a 10K resistance in series!) - A9 A10
- LM35 – A11
- Digital
- Button “Go” – D9
- TSL235 – interrupt pin D0, D1(same to Serial1 Tx, Rx)
- IIC
- SCK,SDA to displayer (remove pin header to save the room)
- Power Module
- Layout
- Programme Code
Connect the holder and motor, and fix it with adhesive. Put in the battery when use it.