Team:Valencia UPV/Software


Printeria Controller
When it comes to automating the process of designing and printing genetic circuits in the lab, there is no denying that Printeria facilitates those tasks for both the average and the experienced user. But, without an interface that allows us to: define all the necessary parameters, keep track of the device’s inventory, simulate the experiment and monitor all of the steps of the execution process, that would not be possible.
We aim to solve that with Printeria Controller, an intuitive software that provides a user-friendly interface meant for all kinds of users, so that everyone can have access to the capabilities of Printeria. This controller helps us achieve the goal of our project: Make synthetic biology easier.
Design Considerations
A web application
Scientists nowadays use computers in the lab to take notes of their experiments, do research, make measurements from the laboratory devices… So we thought, why do not they also use Printeria from the lab computer? Then, extra devices would not be necessary. Once that decision was made, we found a setback: installing software in the computer and setting it all up can be very time-consuming, and sometimes, scientists rely on a system administrator in order to do so. That is why we opted for a web application, implemented in a Raspberry Pi inside Printeria. This approach, solved both the problem of installing the software and the problem of administering it in several computers, because once it is installed, it will only be necessary to monitor the server. Another advantage of that is that no compatibility problems appear, and the compatibility software-hardware is guaranteed. Furthermore, the computer will not be running any program because everything is going to be executed in the Raspberry Pi, so we also rid the computer of the weight of having a program launched and executing.
When deciding which set of technologies might suit best this kind of application, we had several options in mind, and the key aspects we were searching for were:
- Modern technologies.
- Reduced computational workload.
- The use of versatile programming languages.
That is why we chose the MEAN stack, an open source framework to develop dynamic web applications. This framework, backed by Google, provides a highly reliable and scalable infrastructure, and all the components of the stack are based on JavaScript, one of the most used programming languages nowadays.

The MEAN stack is composed of MongoDB, Express.js, Angular.js and Node.js. With all those technologies, we were able to develop all the layers of our application from the client-side (frontend) to the server-side (backend) with ease and flexibility.
Definition of Requirements
During the development of Printeria controller, we thought that the best way of checking that our software tool fulfilled all the users’ requirements, was to show it to the actual users and to let them tell us what they needed. That allowed us to collect the necessary feedback from them in order to start defining all the requirements for our application.
In order to define the requirements, we used SCRUM, an agile methodology that allows making design changes in the software in parallel to its development. For this reason and given the nature of IGEM we considered it to be the best option. This helped us to improve our productivity. We listed and categorized by priority all the requirements that we obtained from the feedback, and then, we started developing the ones with the highest priority. After that, the computer scientist decided the amount of work needed to accomplish all the tasks, dividing the work to be done in sprints (i.e periods of time, restricted to a specific duration, in which the tasks are completed).
Within Printeria Controller, we consider very important to guide the user as a means of success, so we have introduced mechanisms for the user to feel in a familiar environment, such as the use of icons from the SBOL standard, autogenerated hyperlinks or references to the iGEM parts registry.
Every week we had a meeting with the team so that we could show them the progress that was made, and to generate more feedback, in order to apply changes if needed. Once we achieved the goals of a sprint, we chose new features to develop from the backlog, defining all the tasks to be done for the next sprint. By doing that, we achieved the team and user satisfaction because seeing that their suggestions were being implemented, contributed to their involvement in the development process.
Software flow

When the user first accesses to Printeria Controller, it is mandatory to sign up in order to have a registry of all of the experiments that are done and also save the configurations to ease future printings, that way, every time the user wants to print something, it will not be needed to configure it all again. We decided it would be useful for the user to see jobs done in the past, jobs that are currently being executed, information about the user that executed a given job and the possibility to adjust a specific configuration for the experiments.
Once the administrator registers a user, it would be possible to create a “New Job”, a genetic circuit, entering a name and a description for the experiment. The user can choose from a wide variety of DNA parts allocated in our database to design a Transcriptional Unit. This DNA parts have been made compatible with the Golden Gate assembly method and characterized to provide the user with structured information about the DNA part collection. In addition to that, they are represented in the software following the SBOL standard icons. Information about the DNA parts such as mRNA degradation rate or translation rate is displayed in the info button if needed.
More advanced options are provided, such as cycle configuration, in the “Advanced Mode”. With these options the user will be able to select the exact sequence of cycles, the time spent on each of the zones and the temperature, thus defining the instructions for the droplets.

When all the data about the experiment is fulfilled, a modelling simulation can be run before the experiment starts thanks to our Simulation Tool implemented in collaboration with the modeling team. First of all, the software will collect all the necessary data about the experiment and will create a string to be sent through all the layers of the application until it reaches the Raspberry Pi. Here, our modeling python script will be executed and all the data will be generated. Finally, after the modeling results have been stored, a link to their location will be sent to the Frontend in order to be displayed in dynamic charts, giving the user the possibility to download or print them.
Among the options in Printeria, the possibility of saving the genetic circuit in a public recipes repository stands out. This repository is full of recipes, added by Printeria users, that can be printed in our device at any time. Right now it includes more than 20 recipes included by the members of our team. The recipes contain all the information about already made experiments and the results that were obtained, including charts added by the user after an experiment has been performed, dates of the experiments, number of times they have been replicated and of course information about the biological DNA parts used. Those recipes can also be quickly printed if it is needed to add them to a report, for example.
Recipes can be very useful for non-scientific users. They can just search easily a functionality that they want the bacteria to express, for example a fluorescent red bacteria, and just send it to print. Bio artists can benefit from this functionality, as well as students who want to recreate an experiment done by their teacher.

After a recipe or a job has been selected to be printed, the inventory will be checked in order to confirm that the experiment can be executed with the available DNA parts.
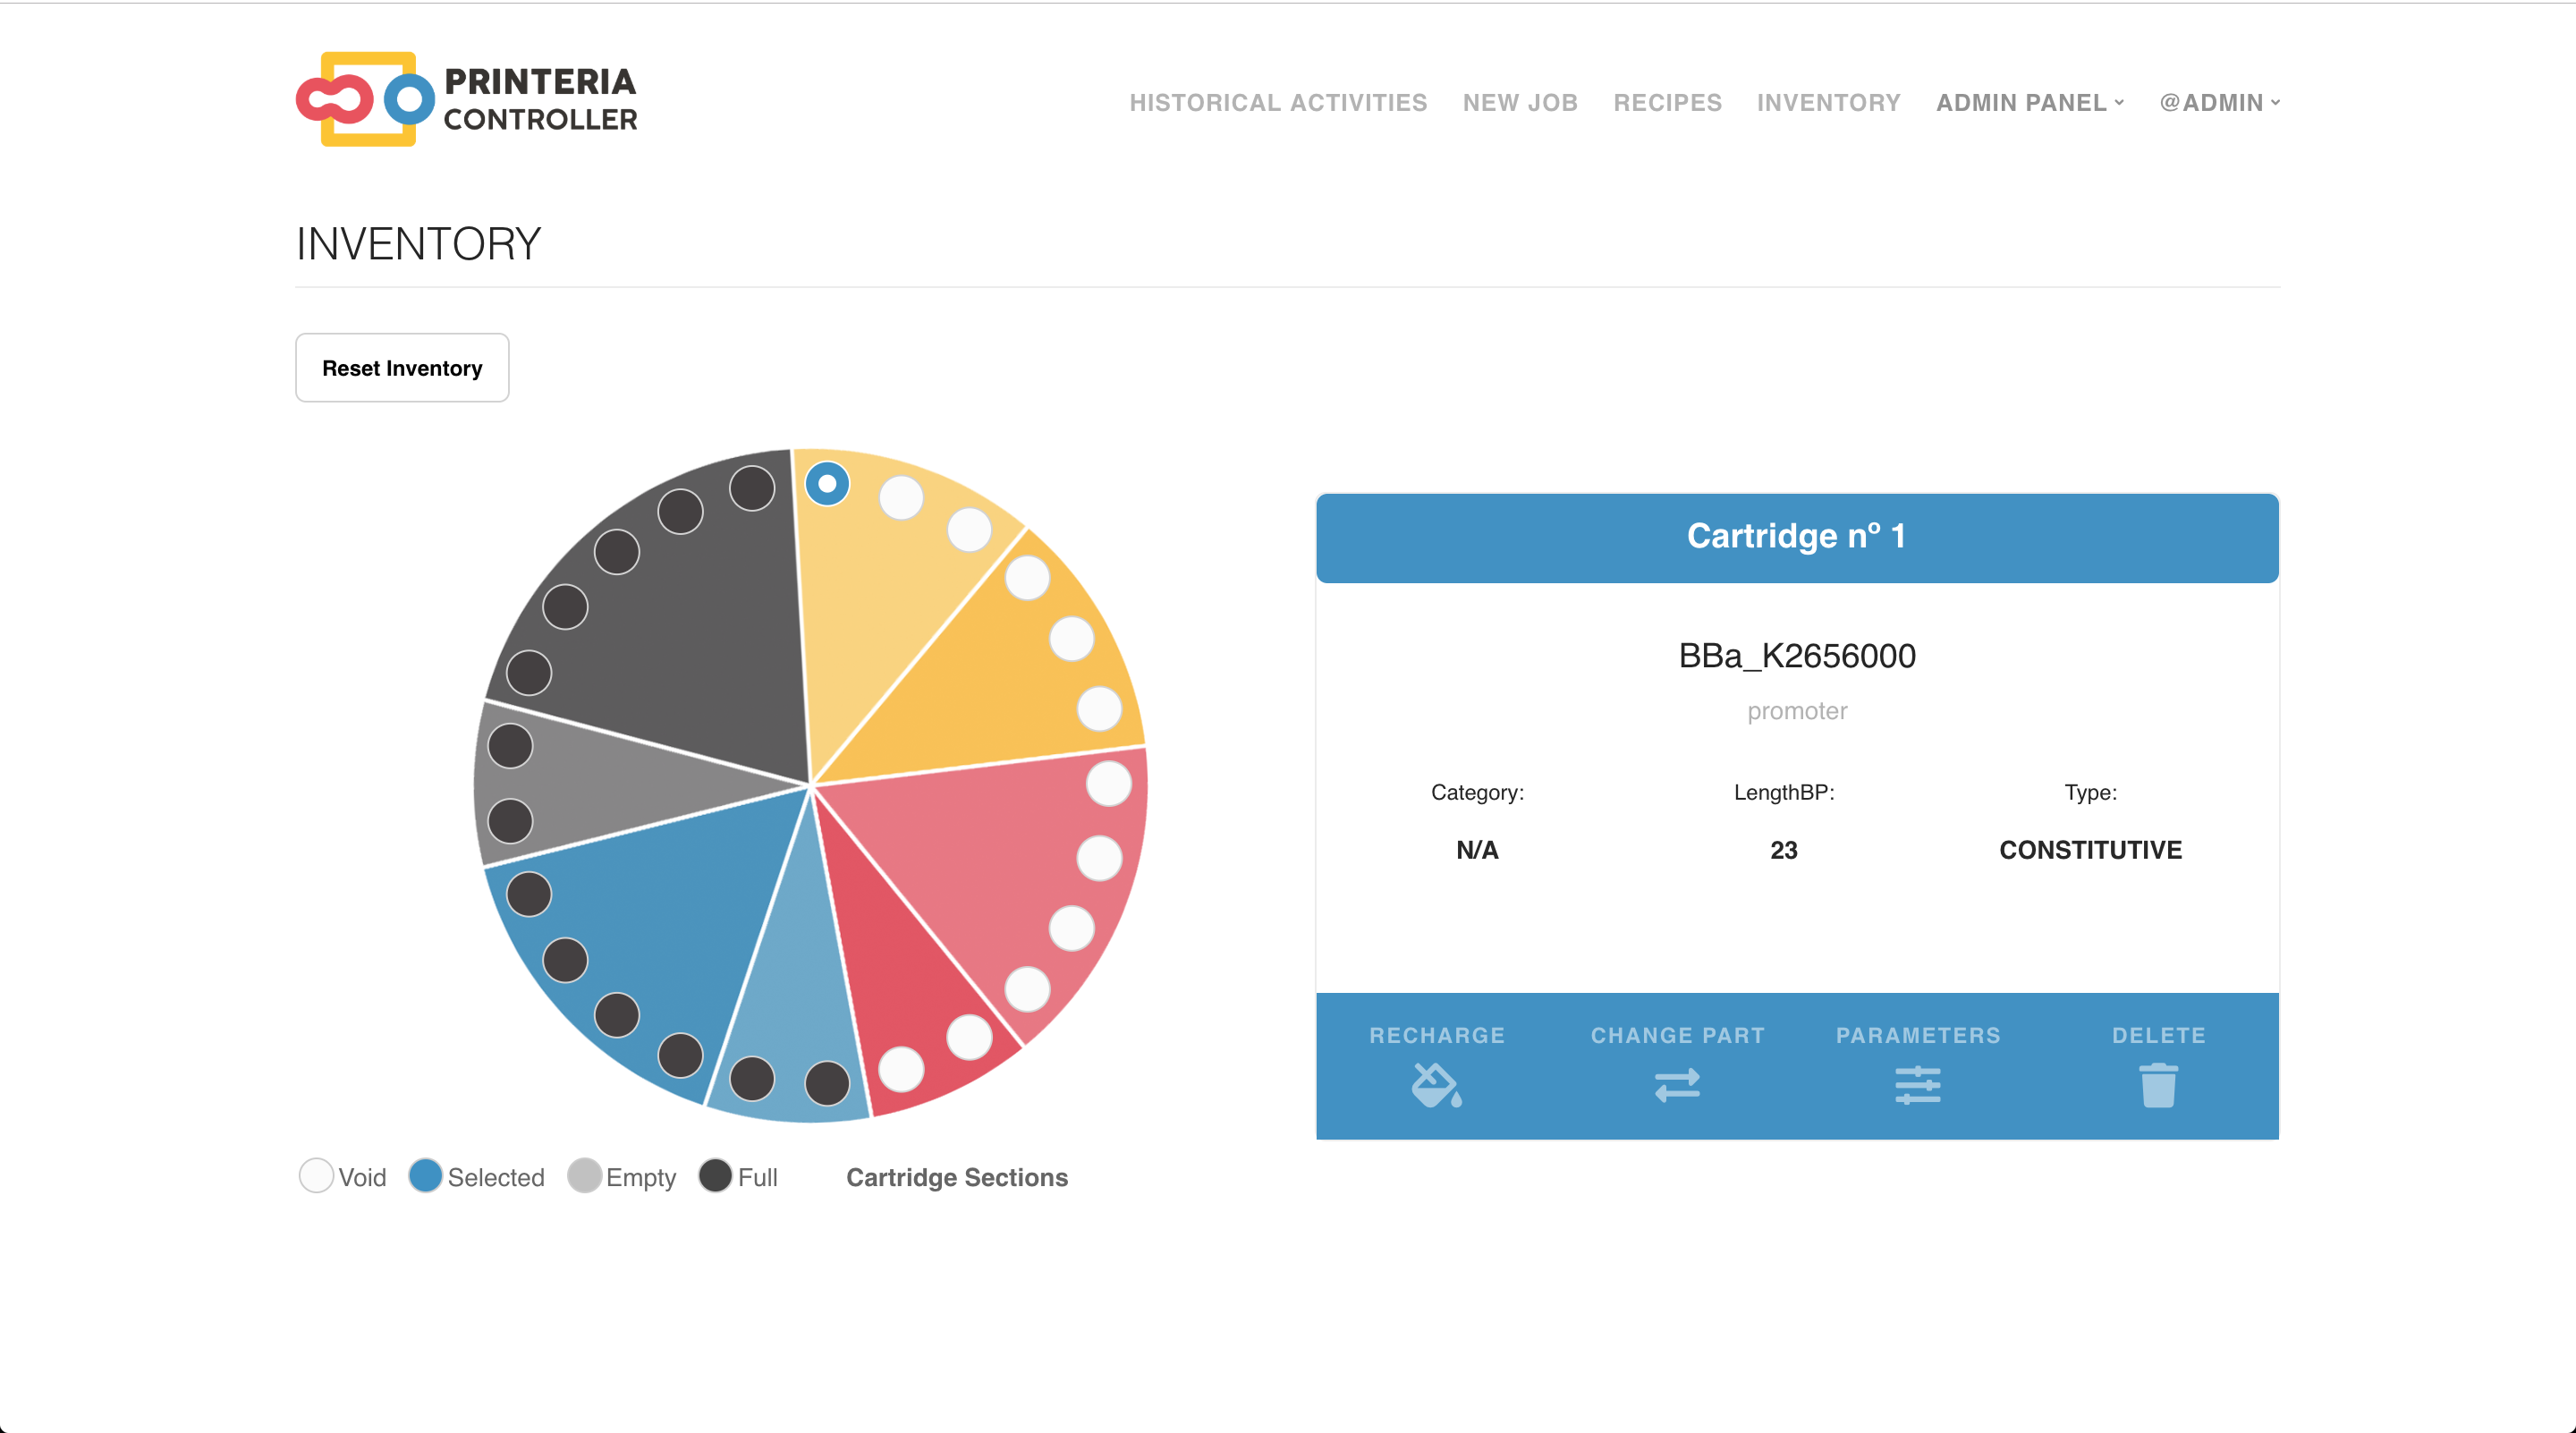
The inventory provides a graphical representation of the wheel that can be found inside of our device, Printeria, with all the cartridges and their contents. The content of the cartridges can be modified, refilled and deleted in order to reflect the changes that are made in the real wheel.
In the first version of Printeria we have opted for a 25 cartridge wheel due to the machine's refrigeration limitations among other aspects. The wheel distribution is the following:
- 3 for promoters.
- 3 for RBSs.
- 4 for CDSs.
- 2 for terminators.
- 2 for bacteria.
- 2 for buffers.
- 4 for enzymes.
- 5 for water and alcohol.
The wheel cartridge distribution was made accordingly to Printeria needs and capabilities. We were aware that the DNA parts could not remain much time at room temperature, and because our hardware device nowadays does not have a refrigerator, the maximum number of DNA parts that could remain in it are two, given that one assembly reaction takes around 4 hours. Nevertheless this fact, we added extra holes for cartridges to add them when they are needed if they are preserved in a refrigerator until the job is sent to be printed. Additionally, water and alcohol cartridges are included to clean the surface of the PCB automatically after every reaction.
The inventory also gives the user the possibility to include parts in the repository either one by one with user-friendly forms for each of the DNA parts or all at once by using a csv (comma-separated values) processing script, allowing the user to load thousands of DNA parts and recipes. The usual workflow would be defining all the DNA parts or recipes to be stored beforehand in Microsoft Excel or another spreadsheet software following the format guidelines, exporting the file in csv format, pasting the contents of the file inside the text form and selecting the type of content to be introduced: Recipes, Promoters, RBSs, CDSs or Terminators.
After a recipe or a job has been sent to be printed, it will be placed in the job queue. This way, the user can follow the experiment and see in real-time how it goes through all the steps of the process.
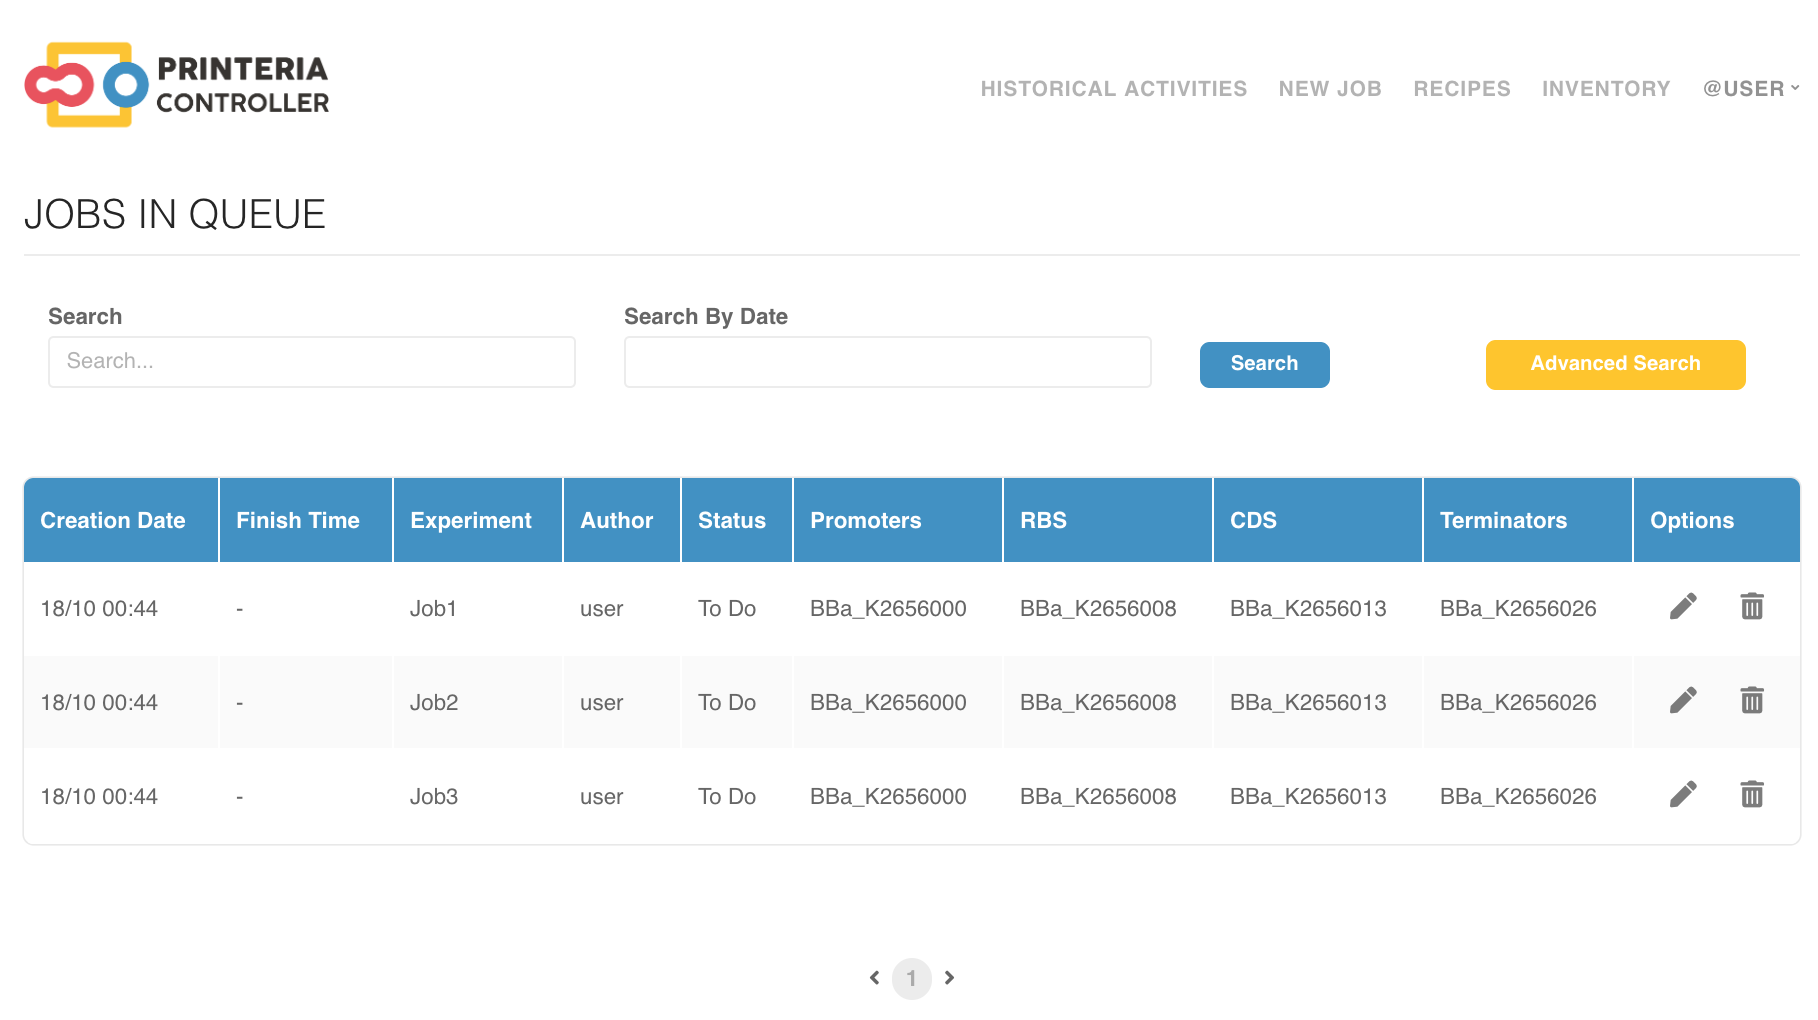
In order to manage the job queue and the communication with the device, we have implemented a heartbeat mechanism. When Printeria Controller is started for the first time, a script is executed, and it will remain sending periodic signals until the device is turned off. This way, we have been able not only to control that the job queue does all the necessary checks before printing a job, but also to retrieve all the information sent from the device and to store it, everything done automatically.
When the job has just entered the job queue, its default status is “To Do”, allowing the user to make modifications or delete the job. When there are no jobs in execution, and all the DNA parts are available in the inventory, the first job in the queue is dequeued and the printing process can start, thus being marked as “Doing”. If the DNA parts are not available in the inventory, the status will change to “Missing”. In case there is any problem during the process, it is possible to cancel the execution, changing the status to “Cancelled”. After the job has been correctly printed, it will be marked as “Done”, and the generated results will be provided.
API
During the specification and validation process of our software tool, we thought that it would be necessary to adapt the application to different kinds of users and also to different platforms, not only to the web.
In order to facilitate the access to Printeria Controller, we developed an API. This way, it would not be necessary to rely on our interface to use all its functionalities. Basically, the idea is that, for each function in our software, there exists a route (i.e an address to that function) that has a predefined structure to read the information that is sent to the application.
So, as an example, in case the user wanted to introduce a Promoter in the application's repository, the only thing needed to do, would be to use the follwing route with an HTTP POST petition:
api/promoter/
By using this route, the Promoter sent to the application will go through all the layers of the application till it reaches the Database, where it will be stored.
Future
As we mentioned before, we have been able to get to IGEM with all the priority functionalities implemented. We have built what we could define as a beta software or first version. In future lines of development, we pretend to add more features in order to make a more powerful Controller.
The most significant of them will be the possibility of a Level 2 assembly. In the New Job tab, users will be able to choose a second Transcriptional Unit as an extra element of the experiment, opening a wider range of possibilities.
The more data we have, the more precise our experiments can be. Therefore, if data about the experiments made in other Printerias was in our hands, apart of having a wider range of different experiments, we could achieve more precision when performing an specific experiment that has already been done by other scientists on their Printerias. That is one of our goals, improving the Recipes tab by adding recipes with data about results of experiments done in another Printeria. Thus, charts and statistics with the average results of experiments could be generated and consulted by the user.
Another very practical feature that we want to develop is that when a biological part runs out, the possibility that the application offers the user prices of the element from different suppliers, so he can directly contact with them if he needs to.
For improving the accesibility to our application, we aim to isolate the source code inside a container, following the Bioconda standard. A container, allows us to deploy our application in such a way that the user can have access to the API, reducing the computational workload and improving the compatibility with different computers. So we thought that Bioconda would be the best choice in order to do so, because it provides a package repository, where our software could be uploaded in order to be easily distributed.
Finally, to achieve a better user experience we will implement an alert system by notifications in the mobile phone and e-mail so the user can know when its job is finished, a problem has occurred, a biological part needed is not in the device… because, maybe he is not in the lab at the moment, and that way he does not have to worry about his job.
We believe that Printeria Controller is a robust software, which is presented in the context of competition as a controller of our device, Printeria, but which has much value for itself, introducing inventory management in the laboratory as well as the exploitation and sharing of massive experimental results.