Difference between revisions of "Team:Valencia UPV/Demonstrate"
Carolinarp (Talk | contribs) |
|||
| (46 intermediate revisions by 7 users not shown) | |||
| Line 49: | Line 49: | ||
<div class="main-container"> | <div class="main-container"> | ||
| − | <section style=" | + | <section style=" |
| − | + | ; ; background-size: 100%;height: 44.2em;margin-top: 0em;padding-top: 1.1em;" class="height-90 parallax"> | |
| − | + | <div class="main-container" style=" | |
| − | + | height: 100%;"> | |
| − | + | <center style=" | |
| − | + | height: 100%;"> | |
| − | + | <div class="col-md-10" style=" | |
| − | + | height: 100%;margin-top: 4em;"> | |
| − | + | <div id="logoPrinteria" class="item" style=" | |
| − | + | background-image: url(https://static.igem.org/mediawiki/2018/thumb/8/86/T--Valencia_UPV--DemonstrateFondoUPV2018.jpeg/1200px-T--Valencia_UPV--DemonstrateFondoUPV2018.jpeg); | |
| − | + | height: 100%; | |
| − | + | width: 100%;background-attachment: fixed;background-size: cover;"><img src="https://static.igem.org/mediawiki/2018/thumb/b/bf/T--Valencia_UPV--DemonstrateTextoUPV2018.jpeg/1200px-T--Valencia_UPV--DemonstrateTextoUPV2018.jpeg.png" style=" margin-top: 0px;"> | |
| − | + | <a class="btn down inner-link active" href="#story" style="font-size: 82%;right: 50%;/* position: fixed; *//* bottom: 7%; */top: 85.2%;z-index: 99;background-color: white;position: absolute;border-radius: 80%;width: 3.8em;height: 3.8em;padding: 0;padding-top: 14px;"> | |
| − | <a class="btn down inner-link active" href="#story" style="font-size: 82%;/* position: fixed; *//* bottom: 7%; */top: | + | <i class="stack-interface stack-down-open-big"></i> |
| − | + | </a> | |
| − | + | </div> | |
| − | + | </div> | |
| − | + | </center> | |
| − | + | </div><div class="all-page-modals"></div><div class="all-page-modals"></div> | |
| − | + | <div class="all-page-modals"></div> | |
| − | + | </section> | |
| − | + | ||
| − | + | ||
| − | + | ||
| − | + | ||
| − | + | ||
| − | + | </div> | |
<a class="anchorOffset" id="story"></a> | <a class="anchorOffset" id="story"></a> | ||
<section class="feature-large" style="padding-top: 6em; padding-bottom: 50px; outline: none;" data-scroll-id="story" tabindex="-1"> | <section class="feature-large" style="padding-top: 6em; padding-bottom: 50px; outline: none;" data-scroll-id="story" tabindex="-1"> | ||
<div class="container"> | <div class="container"> | ||
<div class="row"> | <div class="row"> | ||
| − | + | <div class="col-md-3" style=" | |
| − | + | margin-left: 0em; | |
| − | + | padding-right: 0px; | |
| − | + | padding-left: 0.2em;"> | |
| − | + | <div class="tabs-container tabs--vertical page-navigator" style="position: -webkit-sticky;position: sticky;padding-bottom: 0px;margin-top: 11.4em;"> | |
| − | + | <h4 style=" | |
| − | + | padding-left: 1em; | |
| − | + | ">Index</h4> | |
| − | + | <ul class="lateral"> | |
| − | + | <li class="lateral"> | |
| − | + | <div class="tab__title" style=" | |
| − | + | line-height: 1.3em; | |
| − | + | "> | |
| − | + | <a href="#concept-testing" class="lateral inner-link" style=" | |
| − | + | color: #353535; | |
| − | + | opacity: 1; | |
| − | + | ">Printeria concept-testing</a> | |
| + | </div> | ||
| + | </li> | ||
| + | <li class="lateral"> | ||
| + | <div class="tab__title" style=" | ||
| + | line-height: 1.3em; | ||
| + | "> | ||
| + | <a href="#Wetlab_dem" class="lateral inner-link" style=" | ||
| + | color: #353535; | ||
| + | opacity: 1; | ||
| + | ">Printeria Wet Lab demonstrations</a> | ||
| + | </div> | ||
| + | </li> | ||
| + | <!--</ul> | ||
| + | <ul class="tabs-content">--> | ||
| + | </ul> | ||
| + | </div> | ||
</div> | </div> | ||
| − | + | <div class="col-md-9 col9Attr" style="padding-left: 6em;padding-right: 2em;"> | |
| − | + | <a class="anchorOffset" id="Demonstrate"></a><p> | |
| − | + | ||
| − | + | ||
| − | + | ||
| − | + | ||
| − | + | ||
| − | + | ||
| − | + | ||
| − | + | ||
| − | + | ||
| − | + | ||
| − | + | ||
| − | + | ||
| − | + | ||
| − | + | ||
| − | + | ||
| − | + | ||
| − | + | After long months of effort and dedication, <b>Printeria</b>, the project of the <b>Valencia UPV team</b> is now a reality! All our work has been reflected in our device. With this project we intend to make the approach to Synthetic Biology a reality, but... to what extent has our team been able to develop Printeria? <b>Does it really work?</b> | |
| − | + | </p><a class="anchorOffset" id="concept-testing"></a><h4>Printeria concept-testing</h4> | |
| − | + | <p> | |
| − | + | Here we show all the evidence to prove that the Printeria device really works. | |
| − | + | </p><ul> | |
| − | + | <li><p> | |
| − | + | The <a href="https://2018.igem.org/Team:Valencia_UPV/Hardware#Entry" target="_blank"><b>entry of consumables system</b></a> is a completely original approach in order to dispense precise quantities of liquid in a compact and highly controllable way. In the following video it is shown how our entry system works: | |
| − | + | </p></li> | |
| − | + | <a href="https://static.igem.org/mediawiki/2018/d/db/T--Valencia_UPV--ENTRADA5UPV2018.gif" data-lightbox="true"> | |
| − | + | <img src="https://static.igem.org/mediawiki/2018/d/db/T--Valencia_UPV--ENTRADA5UPV2018.gif"> | |
| − | + | </a> | |
| − | + | <h6 style="text-align: right;">Image 1.Proof of concept of the entry system</h6> | |
| − | + | <li><p> | |
| − | + | The <b>digital microfluidics technology</b> is the basis of Printeria. It allows us to recreate the experiments that take place in the lab in an accurate and automated way, providing a high<a href="https://2018.igem.org/Team:Valencia_UPV/Hardware#Reaction" target="_blank"> control of the reactions</a>. First, we accomplished the movement of the droplets in <b>smaller test boards</b>, as you can see here: | |
| − | + | </p> | |
| − | + | <a href="https://static.igem.org/mediawiki/2018/8/88/T--Valencia_UPV--PCBPRUEBAUPV2018.jpeg" data-lightbox="true"> | |
| − | + | <img src="https://static.igem.org/mediawiki/2018/8/88/T--Valencia_UPV--PCBPRUEBAUPV2018.jpeg"> | |
| − | + | </a> | |
| − | + | <h6 style="text-align: right;">Image 2. Test board</h6> | |
| − | + | <p> | |
| − | + | After testing the digital microfluidic technology, we were able to approach the <a href="https://2018.igem.org/Team:Valencia_UPV/Hardware#finaldesign" target="_blank"><b>final surface design</b></a>. We made it larger so that it could hold a <b>higher number of pads</b> and, the hot and cold zones could be implemented, leading to the following design: | |
| − | + | </p> | |
| − | + | <a href="https://static.igem.org/mediawiki/2018/a/ab/T--Valencia_UPV--PCBFINALUPV2018.jpeg" data-lightbox="true"> | |
| − | + | <img src="https://static.igem.org/mediawiki/2018/a/ab/T--Valencia_UPV--PCBFINALUPV2018.jpeg"> | |
| − | + | </a> | |
| − | + | <h6 style="text-align: right; ">Image 3. PCB surface final design</h6> | |
| − | + | </li> | |
| − | + | ||
| − | + | <li><p> | |
| − | + | In order to do the assembly, it is necessary to make the droplets go through <a href="https://2018.igem.org/Team:Valencia_UPV/Hardware#thermo" target="_blank"><b>cyclic temperature changes</b></a>. For this purpose, cold and hot zones have been implemented, thanks to a resistance and two peltiers between the drops will move. To prove if the zones work, an assembly of <a href="http://parts.igem.org/Part:BBa_K2656103" target="_blank"><b>BBa_K2656024</b></a> into <a href="http://parts.igem.org/Part:BBa_P10500" target="_blank"><b>BBa_P10500</b></a> was made with good results: | |
| − | + | </p></li> | |
| − | + | ||
| − | + | ||
| − | + | ||
| − | + | ||
| − | + | ||
| − | + | ||
| − | + | ||
| − | + | ||
| − | + | ||
| − | + | ||
| − | + | <a href="https://static.igem.org/mediawiki/2018/9/9d/T--Valencia_UPV--PETRIUPV2018.jpeg" data-lightbox="true"> | |
| − | + | <img src="https://static.igem.org/mediawiki/2018/9/9d/T--Valencia_UPV--PETRIUPV2018.jpeg"> | |
| + | <div style=" | ||
| + | width: 100%; | ||
| + | padding-left: 19em; | ||
| + | padding-right: 1em; | ||
| + | "><h6>Image 4. Hot and cold zones' experiment results</h6> | ||
| + | </div></a> | ||
| − | + | <li> | |
| + | <p>Once the assembly process has been made, it is necessary to do the transformation of bacteria. We have implemented an <a href="https://2018.igem.org/Team:Valencia_UPV/Hardware#electroporator" target="_blank"><b>electroporator</b></a> based on the design made by the <a href="https://2016.igem.org/Team:Valencia_UPV/Hardware" target="_blank" style="padding-right: 0">Hype It iGEM project (Valencia_UPV 2016 team)</a>. The electroporator was tested in a cuvette before implementing it in Printeria.</p> | ||
| + | <div> | ||
| + | <div class="row" style=" | ||
| + | margin: 0; | ||
| + | "> | ||
| + | <div class="col-md-6" style=" | ||
| + | padding: 0; | ||
| + | padding-right: 0.3em; | ||
| + | "> | ||
| + | <a href="https://static.igem.org/mediawiki/2018/e/eb/T--Valencia_UPV--ELECTROPORADOR1UPV2018.jpeg" data-lightbox="true"> | ||
| − | + | <img src="https://static.igem.org/mediawiki/2018/e/eb/T--Valencia_UPV--ELECTROPORADOR1UPV2018.jpeg" style=" | |
| − | + | margin-top: 0.5em;"> | |
| − | + | ||
| − | + | ||
| − | + | ||
| − | + | ||
| − | + | ||
| − | + | ||
| − | + | ||
| − | + | ||
| − | + | ||
| − | + | ||
| − | + | ||
| − | + | ||
| − | + | ||
| − | + | ||
| − | + | ||
| − | + | ||
| − | + | </a> | |
| − | + | ||
| − | + | </div> | |
| − | + | <div class="col-md-6" style=" | |
| − | + | padding: 0; | |
| − | + | padding-left: 0.3em;"> | |
| + | <a href="https://static.igem.org/mediawiki/2018/c/c2/T--Valencia_UPV--ELECTROPORADOR2UPV2018.jpeg" data-lightbox="true"> | ||
| + | <img src="https://static.igem.org/mediawiki/2018/c/c2/T--Valencia_UPV--ELECTROPORADOR2UPV2018.jpeg" style=" | ||
| + | margin-top: 0.5em;"> | ||
| + | </a> | ||
| + | </div> | ||
| + | <div style=" | ||
| + | width: 100%; | ||
| + | padding-left: 19em; | ||
| + | padding-right: 1em; | ||
| + | "><h6>Image 5a. Electroporator set up.<br>Image 5b. Results of the electroporator testing.</h6> | ||
| + | </div> | ||
| + | </div> | ||
| + | </div> | ||
| − | + | </li> | |
| − | + | <a id="curvesFOD" class="anchorOffset"></a> | |
| − | + | <li><p> | |
| − | + | ||
| − | + | ||
| − | + | Once the transformed bacteria are ready, they are sent to the <a href="https://2018.igem.org/Team:Valencia_UPV/Hardware#Measurement" target="_blank">measurement system</a> in order to culture them while <b>OD and fluorescence measurements</b> are taken. It consists of a system based on a shaker, which has holders for the incubated tubes in which the bacteria will be stored. To those holders, there are sensors attached to monitor the growth of the bacteria and to measure the fluorescence obtained. To test the system, we have used the shaker while OD and Fluorescence measurements have been made. The results of our tests are the following: | |
| − | + | <a href="https://static.igem.org/mediawiki/2018/5/5a/T--Valencia_UPV--od_Printeria_sensorUPV2018.png" data-lightbox="true"> | |
| + | <img src="https://static.igem.org/mediawiki/2018/5/5a/T--Valencia_UPV--od_Printeria_sensorUPV2018.png"> | ||
| + | </a> | ||
| + | </p><h6 style="text-align: right; ">Figure 1. OD measurements registred by Printeria's OD sensor and fitted to an exponential curve of cell growth.</h6> | ||
| − | |||
| − | |||
| − | |||
| − | |||
| − | + | <a href="https://static.igem.org/mediawiki/2018/e/ed/T--Valencia_UPV--calibrationODUPV2018.pnghttps://static.igem.org/mediawiki/2018/e/ed/T--Valencia_UPV--calibrationODUPV2018.png" data-lightbox="true"> | |
| − | + | <img src="https://static.igem.org/mediawiki/2018/e/ed/T--Valencia_UPV--calibrationODUPV2018.png"> | |
| − | + | </a> | |
| − | + | </p><h6 style="text-align: right; ">Figure 2. OD calibration curve. We have calibrated the data from the OD Printeria sensor with the OD data from the Biotek Cytation3 equipment.</h6> | |
| − | + | ||
| − | + | ||
| − | + | <a href="https://static.igem.org/mediawiki/2018/9/91/T--Valencia_UPV--calibrationFODUPV2018.png" data-lightbox="true"> | |
| − | + | <img src="https://static.igem.org/mediawiki/2018/9/91/T--Valencia_UPV--calibrationFODUPV2018.png"> | |
| + | </a> | ||
| + | <h6 style="text-align: right; ">Figure 3. Fluorescence calibration curve. We have calibrated the data from the Fluorescence Printeria sensor with the fluorescence data from the Biotek Cytation3 equipment.</h6> | ||
| + | </li> | ||
| − | |||
| − | |||
| − | |||
| − | |||
| − | |||
| − | |||
| − | |||
| − | |||
| − | |||
| − | |||
| − | + | ||
| − | + | ||
| − | + | ||
| − | + | ||
| − | + | ||
| − | + | ||
| − | + | ||
| − | + | ||
| − | + | ||
| − | + | ||
| − | + | ||
| − | + | </ul><a class="anchorOffset" id="Wetlab_dem"></a><h4>Printeria Wet Lab demonstrations</h4> | |
| − | + | ||
| − | + | ||
| − | + | ||
| − | + | ||
| − | + | ||
| − | + | ||
| − | + | ||
| − | + | ||
| − | + | ||
| − | + | ||
| − | + | ||
| − | + | ||
| − | + | ||
| − | + | ||
| − | + | ||
| − | + | ||
| − | + | ||
| − | + | ||
| − | + | ||
| − | + | ||
| − | + | ||
| − | + | ||
| − | + | ||
| − | + | ||
| − | + | ||
| − | + | ||
| − | + | ||
| − | + | ||
| − | + | ||
| − | + | ||
| − | + | ||
| − | + | ||
| − | + | ||
| − | + | ||
| − | + | <p> | |
| − | + | In this section you can check all our Wet Lab demonstrations: | |
| − | + | </p> | |
| − | + | ||
| + | |||
| + | <div style=" | ||
| + | padding-left: 0px;padding-bottom: 0em;float: right;" class="col-md-12"> | ||
| + | <div class="col-md-7" style=" | ||
| + | float: left;"> <p> | ||
| + | We have proved that assembling functional composite parts with the <a href="https://2018.igem.org/Team:Valencia_UPV/Design#GB" target="_blank"> Golden Gate method</a> with our basic parts is possible. Here you can see a <a href="http://parts.igem.org/wiki/index.php?title=Part:BBa_K2656109" target="_blank">mRFP transcriptional unit</a> been obtained with the Golden Gate assembly method. | ||
| + | |||
| + | Red colonies are these that have correctly taken up the recombinant plasmid (which carries the composite part), whereas white colonies are those carrying the non-recombinant plasmid. As it can be seen, transcriptional unit assembly has been effectively achieved with our DNA basic parts. On the other hand, the percentage of recombinant colonies is high, but there are still more colonies with the not desired plasmid. | ||
| + | </p></div><div style=" | ||
| + | float: right;;padding-bottom: 1em;padding-left: 1em;" class="col-md-5"> | ||
| + | |||
| − | + | <div> | |
| − | + | <img src="https://static.igem.org/mediawiki/2018/6/63/T--Valencia_UPV--BBa_K2656109_imgUPV2018.png" alt="" style=" | |
| − | + | width: 16em;right: 0px !important;;margin-top: 0.5em;" class="img-fluid"> | |
| − | + | <h6 style=" | |
| − | + | padding-right: 3em; | |
| − | + | padding-left: 2em;width: 311px;margin: 0;display: table-caption;">Image 6. Transformed bacteria resulting from the assembly of BBa_K2656109 TU.</h6></div> | |
| − | + | ||
| − | |||
| − | |||
| − | |||
| − | |||
| − | |||
| − | + | </div> | |
| − | + | </div><div style=" | |
| + | padding-left: 0px;padding-bottom: 0em;float: right;" class="col-md-12"> | ||
| + | <div class="col-md-7" style=" | ||
| + | padding-top: 2em; | ||
| + | float: left;"> <p style=" | ||
| + | width: 100%; | ||
| + | "> | ||
| + | Thus, we also desired to avoid the plate colony screening step. To do so, we have used the linearized destination vector for the Level 1 Golden Gate assembly. In this way, only the circularized plasmids will be taken up by the bacteria with high efficiency, as linear double-stranded DNA transformation in E. coli is generally inefficient due to the exonucleolytic degradation. Thus, we have proved that using the linearized destination vector very small number of bacteria transformed with the vector without the insert are obtained. Here you can see a GFP transcriptional unit obtained with 25 ng of linearized destination vector. For both experiments (this and the previous one), 10G electrocompetent cells with same transformation efficiency had been used, and transforming was made with same DNA quantity. Consequently, it can be concluded that the efficiency of the reaction is lower compared to the one with the circularized plasmid (as there are less transformants in the plate), but the number of plasmids without the desired insert is highly reduced too (6 colonies with the non-recombinant vector / 71 total colonies = 8.5 % background colonies). For Printeria use, the efficiency of this transformation is high enough. | ||
| − | + | </p></div><div style=" | |
| − | + | float: right;;padding-bottom: 1em;padding-left: 1em;" class="col-md-5"> | |
| − | + | ||
| − | + | <div> | |
| − | + | <img src="https://static.igem.org/mediawiki/2018/0/0c/T--Valencia_UPV--BBa_K2656105_imgUPV2018.png"> | |
| + | <h6>Image 7. TU assembly of K2656105 with linearized plasmid </h6></div> | ||
| − | |||
| − | |||
| − | |||
| − | |||
| − | |||
| − | |||
| − | |||
| − | |||
| − | |||
| − | + | </div> | |
| − | + | </div> | |
| − | + | ||
| − | + | ||
| − | </div> | + | <p> |
| − | + | </p> <p></p> | |
| − | + | ||
| + | <p></p><div><p style=" | ||
| + | padding-left: 0px;"> | ||
| + | |||
| + | Another demonstration is that electrocompetent bacteria can be stored at -20ºC for at least two weeks and chilled for 4 hours at room temperature (30.3ºC) without completely losing their competence. | ||
| + | </p><a href="https://static.igem.org/mediawiki/2018/e/ea/T--Valencia_UPV--competent_cellsUPV2018.png" data-lightbox="true"> | ||
| + | <img src="https://static.igem.org/mediawiki/2018/e/ea/T--Valencia_UPV--competent_cellsUPV2018.png"> | ||
| + | |||
| + | </a><h6 style=" | ||
| + | margin-right: 0px !important;text-align: left; padding-left: 5em;padding-left: env(); | ||
| + | margin-right: 0px !important;text-align: left; padding-left: 0em;">Image 8. Serial decimal dilutions (from left to right: 10<sup>-2</sup>, 10<sup>-1</sup> and 10<sup>0</sup>) of transformed electrocompetent bacteria stored at -20°C for two weeks and set at Room Temperature (37°C) 4 hours before electroporation. These bacteria are transformed with P10500 and plated in LB-agar petri dishes with cloranphenicol. </h6></div><div style=" | ||
| + | margin-top: 24px;"><p style=" | ||
| + | padding-top: 16px;"> | ||
| + | </p><p>The transformation efficiency was 10<sup>4</sup> CFU/microgram of DNA. This low data may be due to the fact that instead of using 1ng of plasmid control, 200 were used, and efficiency may be lost. </p><p>This efficiency may be low for a normal cloning process, but thanks to avoiding the plate screening phase, we do not require higher efficiencies.</p> | ||
| + | <p>Finally, to compare the efficiency of <b>Golden Gate vs BioBricks assembly</b>, we have designed a <a href="https://2018.igem.org/Team:Valencia_UPV/Experiments#GGBB_exp" target="_blank">comparative experiment</a> between two transcriptional units of identical structure but assembled with Golden Gate and BioBricks method, respectively. Our results demonstrate that both methods have the same efficiency.</p> | ||
| + | <p></p></div><a href="https://static.igem.org/mediawiki/2018/1/17/T--Valencia_UPV--comparison_GGBB_graphUPV2018.png" data-lightbox="true"> | ||
| + | <img src="https://static.igem.org/mediawiki/2018/1/17/T--Valencia_UPV--comparison_GGBB_graphUPV2018.png"> | ||
| + | </a><h6 style="text-align: left; padding-left: 5em;">Figure 4. Comparison between fluorescence and absorbance of Golden Gate and BioBrick TU.</h6><div> | ||
| + | <div> | ||
| + | <div style=""> | ||
| + | </div> | ||
| + | </div> | ||
| + | </div> | ||
| + | </div> | ||
| + | </div> | ||
</div> | </div> | ||
</section> | </section> | ||
| − | |||
| − | |||
| − | |||
| − | |||
| − | |||
<!--<div class="loader"></div>--> | <!--<div class="loader"></div>--> | ||
Latest revision as of 11:11, 7 December 2018


After long months of effort and dedication, Printeria, the project of the Valencia UPV team is now a reality! All our work has been reflected in our device. With this project we intend to make the approach to Synthetic Biology a reality, but... to what extent has our team been able to develop Printeria? Does it really work?
Printeria concept-testing
Here we show all the evidence to prove that the Printeria device really works.
The entry of consumables system is a completely original approach in order to dispense precise quantities of liquid in a compact and highly controllable way. In the following video it is shown how our entry system works:
The digital microfluidics technology is the basis of Printeria. It allows us to recreate the experiments that take place in the lab in an accurate and automated way, providing a high control of the reactions. First, we accomplished the movement of the droplets in smaller test boards, as you can see here:

Image 2. Test board
After testing the digital microfluidic technology, we were able to approach the final surface design. We made it larger so that it could hold a higher number of pads and, the hot and cold zones could be implemented, leading to the following design:

Image 3. PCB surface final design
In order to do the assembly, it is necessary to make the droplets go through cyclic temperature changes. For this purpose, cold and hot zones have been implemented, thanks to a resistance and two peltiers between the drops will move. To prove if the zones work, an assembly of BBa_K2656024 into BBa_P10500 was made with good results:
-
Once the assembly process has been made, it is necessary to do the transformation of bacteria. We have implemented an electroporator based on the design made by the Hype It iGEM project (Valencia_UPV 2016 team). The electroporator was tested in a cuvette before implementing it in Printeria.
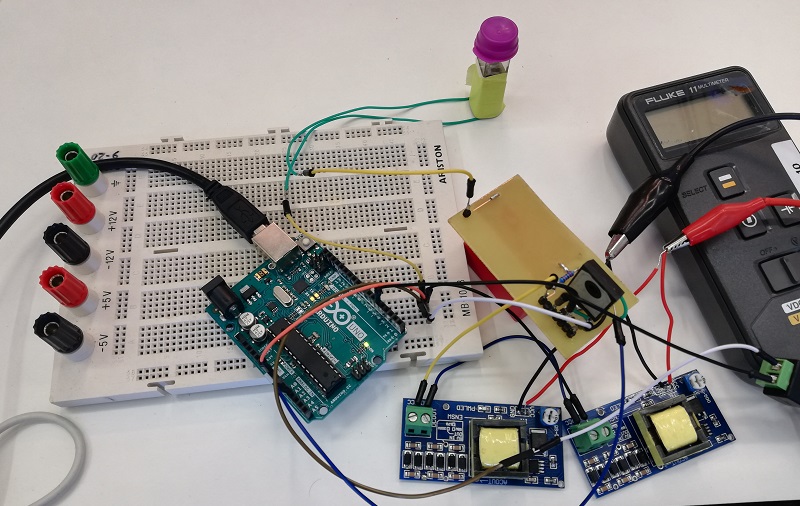

Image 5a. Electroporator set up.
Image 5b. Results of the electroporator testing. Once the transformed bacteria are ready, they are sent to the measurement system in order to culture them while OD and fluorescence measurements are taken. It consists of a system based on a shaker, which has holders for the incubated tubes in which the bacteria will be stored. To those holders, there are sensors attached to monitor the growth of the bacteria and to measure the fluorescence obtained. To test the system, we have used the shaker while OD and Fluorescence measurements have been made. The results of our tests are the following:

Figure 1. OD measurements registred by Printeria's OD sensor and fitted to an exponential curve of cell growth.

Figure 2. OD calibration curve. We have calibrated the data from the OD Printeria sensor with the OD data from the Biotek Cytation3 equipment.
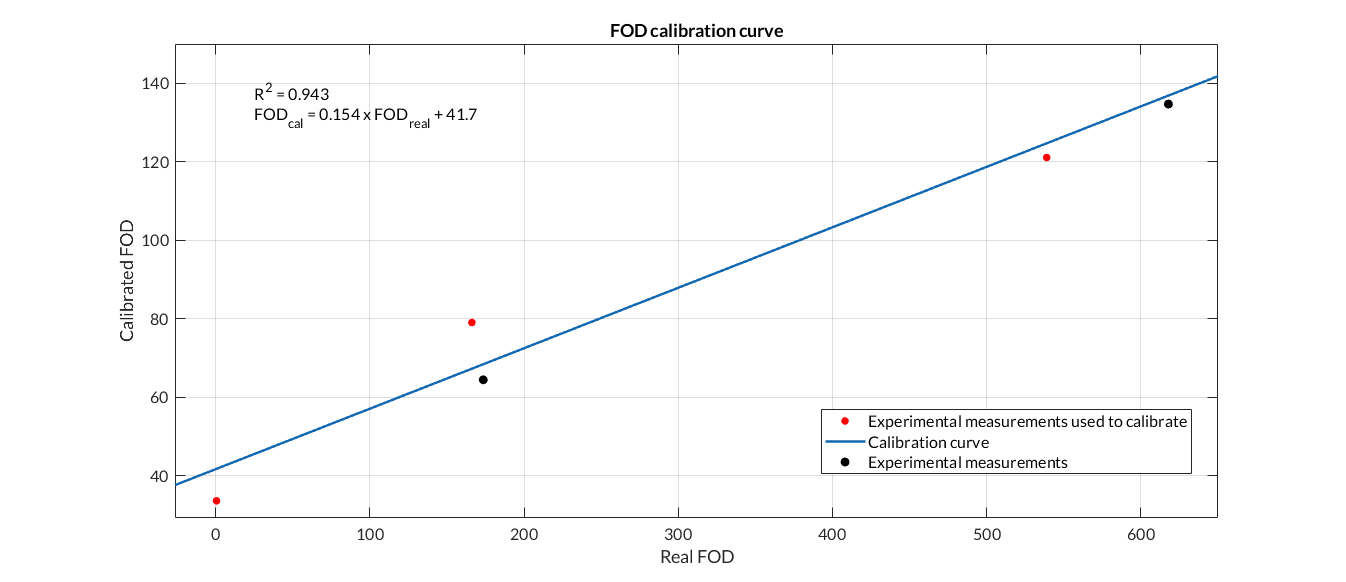
Figure 3. Fluorescence calibration curve. We have calibrated the data from the Fluorescence Printeria sensor with the fluorescence data from the Biotek Cytation3 equipment.
Image 1.Proof of concept of the entry system

Image 4. Hot and cold zones' experiment results

Printeria Wet Lab demonstrations
In this section you can check all our Wet Lab demonstrations:
We have proved that assembling functional composite parts with the Golden Gate method with our basic parts is possible. Here you can see a mRFP transcriptional unit been obtained with the Golden Gate assembly method. Red colonies are these that have correctly taken up the recombinant plasmid (which carries the composite part), whereas white colonies are those carrying the non-recombinant plasmid. As it can be seen, transcriptional unit assembly has been effectively achieved with our DNA basic parts. On the other hand, the percentage of recombinant colonies is high, but there are still more colonies with the not desired plasmid.

Image 6. Transformed bacteria resulting from the assembly of BBa_K2656109 TU.
Thus, we also desired to avoid the plate colony screening step. To do so, we have used the linearized destination vector for the Level 1 Golden Gate assembly. In this way, only the circularized plasmids will be taken up by the bacteria with high efficiency, as linear double-stranded DNA transformation in E. coli is generally inefficient due to the exonucleolytic degradation. Thus, we have proved that using the linearized destination vector very small number of bacteria transformed with the vector without the insert are obtained. Here you can see a GFP transcriptional unit obtained with 25 ng of linearized destination vector. For both experiments (this and the previous one), 10G electrocompetent cells with same transformation efficiency had been used, and transforming was made with same DNA quantity. Consequently, it can be concluded that the efficiency of the reaction is lower compared to the one with the circularized plasmid (as there are less transformants in the plate), but the number of plasmids without the desired insert is highly reduced too (6 colonies with the non-recombinant vector / 71 total colonies = 8.5 % background colonies). For Printeria use, the efficiency of this transformation is high enough.

Image 7. TU assembly of K2656105 with linearized plasmid
Another demonstration is that electrocompetent bacteria can be stored at -20ºC for at least two weeks and chilled for 4 hours at room temperature (30.3ºC) without completely losing their competence.
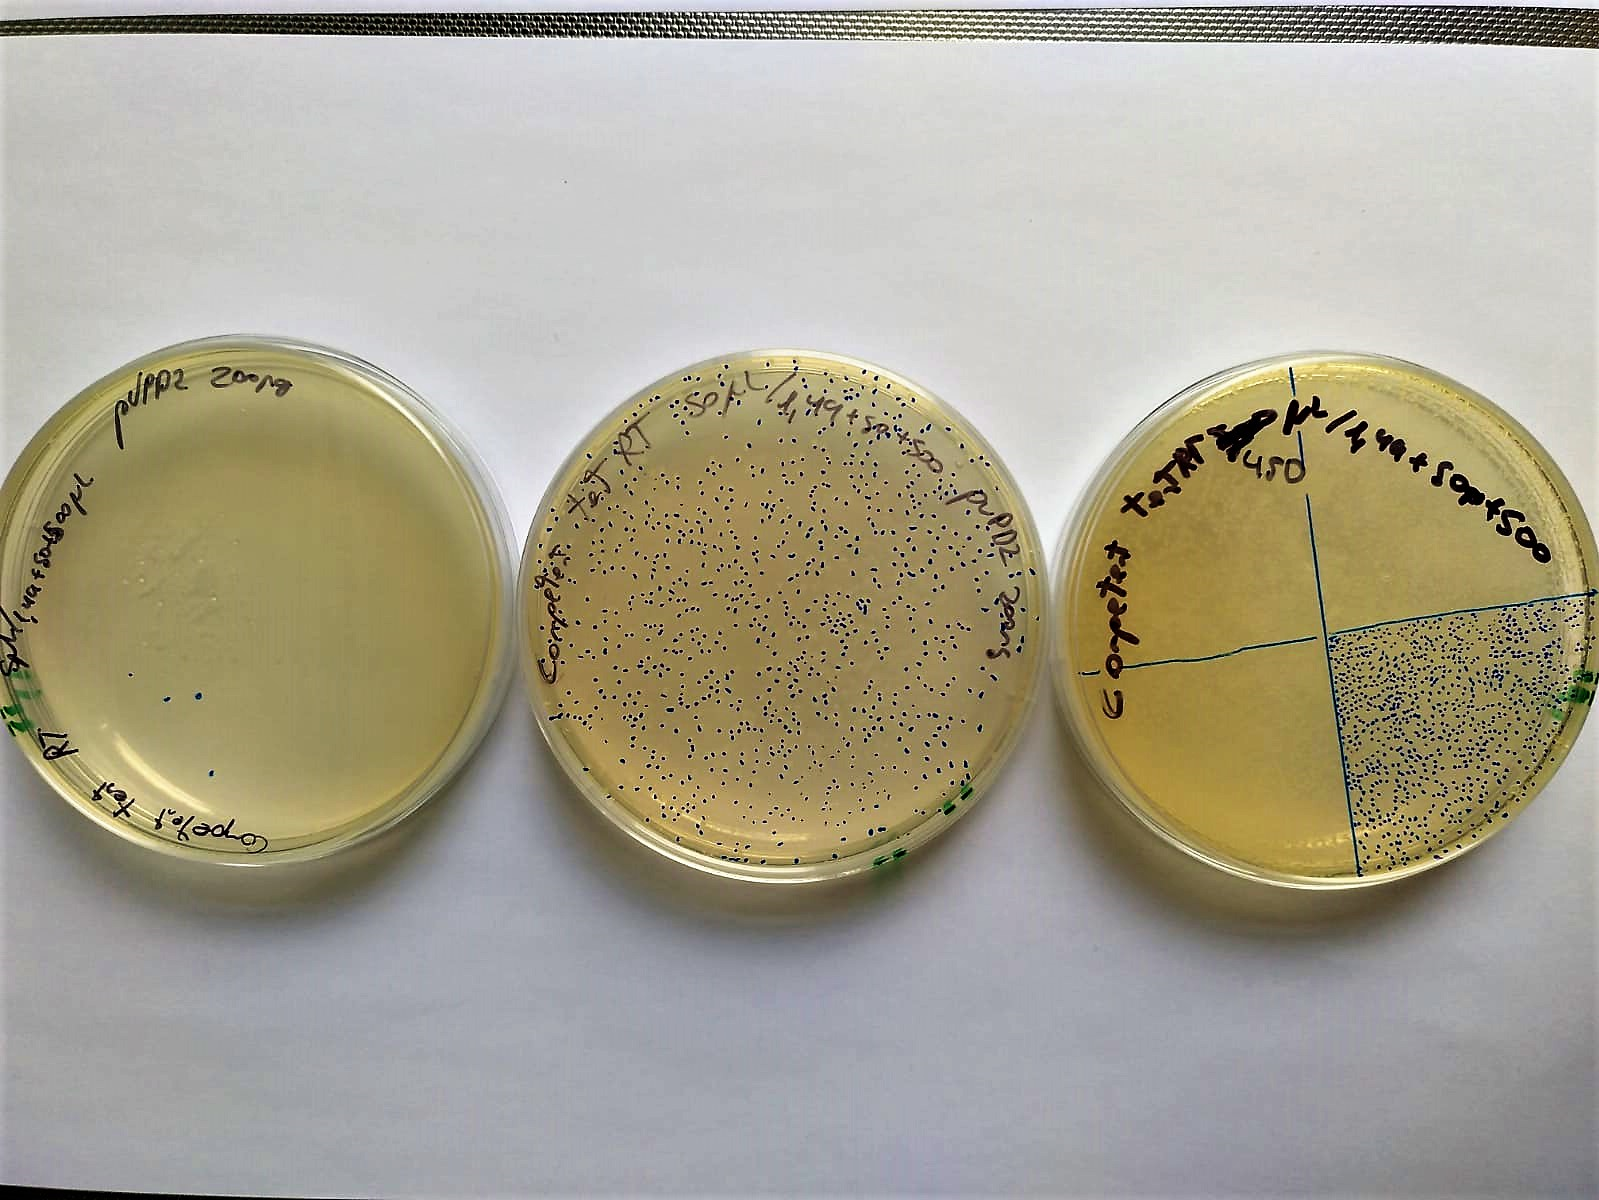
Image 8. Serial decimal dilutions (from left to right: 10-2, 10-1 and 100) of transformed electrocompetent bacteria stored at -20°C for two weeks and set at Room Temperature (37°C) 4 hours before electroporation. These bacteria are transformed with P10500 and plated in LB-agar petri dishes with cloranphenicol.
The transformation efficiency was 104 CFU/microgram of DNA. This low data may be due to the fact that instead of using 1ng of plasmid control, 200 were used, and efficiency may be lost.
This efficiency may be low for a normal cloning process, but thanks to avoiding the plate screening phase, we do not require higher efficiencies.
Finally, to compare the efficiency of Golden Gate vs BioBricks assembly, we have designed a comparative experiment between two transcriptional units of identical structure but assembled with Golden Gate and BioBricks method, respectively. Our results demonstrate that both methods have the same efficiency.

Figure 4. Comparison between fluorescence and absorbance of Golden Gate and BioBrick TU.